Android Things Thing
Google gave Max an Android Thing in March 2018 because she is a woman.
The onsite workshop got as far as assembling the Thing and getting it to connect to WiFi. Unfortunately I used a loaner laptop at Google to get it set up, so now I have to get a Resistor computer configured to do the same.
This is (we think) a NXP i.MX7D device
- Assemble the parts! https://developer.android.com/things/hardware/imx7d-kit.html
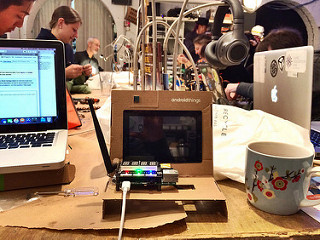
It may look like this when it's done:
- Update the firmware (is that even what they call it at Google?)
- Starting point is here:https://developer.android.com/things/hardware/imx7d.html
- Which sends you here: https://partner.android.com/things/console/#/tools, where you have to log in with a google account (gmail is fine)
- Once you login in, click the button to "Download" the Setup Utility. Unzip the download and then use a command line interface to unzip the file, and change into the directory created. Check out the README.md, but basically the next step is to run some version of the ./android-things-setup-utility from the command line.
- When the command line tool chokes on access to https://storage.googleapis.com/things-images/hashes.json, try opening https://googleapis.com in a browser in order to get the certificate accepted, then navigate to the full https://storage.googleapis.com/things-images/hashes.json url via the browser, THEN rerun the command line tool.
- Select "1 - Install Android Things and optionally set up Wi-Fi" to get going
- Select "2 - NXP Pico i.MX7D" God, I hope that is actually the model of this damned thing.
- If you make some real progress ... next selection is "1 - Default image: Used for development purposes."
- Then finally, at the very scary "The USB cable should plug into your board's USB-C port. .... Once connected, press [Enter] to install Android Things on the device..." go on ahead and press Enter.
MAYBE VICTORY? Widget and the other guy identified (by reading the instructions) that we needed a powered USB In other words, that part I snipped from the instruction steps: "If your computer also has USB-C ports like the more recent MacBooks, you will need to use a USB hub. Otherwise the board won't power on correctly." Now, we're digging around for a powered USB hub.
Woah babeeee! Used the USB powered hub labelled "Pluggable" from the USB drawer in Thanksgiving, with a 5v power supply, a USB to mini (or is it micro) cable linking laptop to USB hub, and the USB cable that came with the Android Things kit connecting the hub to the Android Things Thing.
Once it was powered properly, the preloaded TensorFlow dog app did light up on the device.
I (foolishly) updated the Thing with the blinking led, now everything is broken again.
BUT I found the 'adb' utility!!
/Users/Guest/Library/Android/sdk/platform-tools/adb devices`` successfully shows that nothing is attached.
Enough clicking around and exploring and I remembered the undocumented step from the in person demo:
You much go to Android Studio Preferences >> Build, Execution, Deployment >> Instant Run and disable instant run by unchecking "Enable Instant Run"
And wel l fucking right - there it is. Now the capacitive touch button 'A' makes the red led light up while you are touching it.
I wish I was happier about it.
