Barbot

Guess what? The contents of this page have nothing to do with the latest barbot. Whee!
Resources for Barbot 4
[edit | edit source]Overview
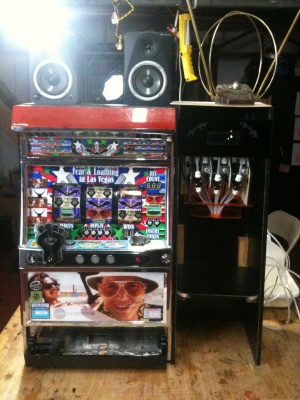
[edit | edit source]You see a vaguely anthropomorphic equipment rack; I see our own personal Roboexotica.
(Looking through past roboexoticas: looks like the bar is set pretty low, har har.)
History and Schedule
[edit | edit source]Work on Barbot v1 began in earnest on Saturday, March 22nd. Virtually every member of NYCResistor contributed in some way.
48 250ml beakers arrived on Thursday, March 27th.
The valves for Barbot v1 arrived on Thursday, March 27th. As we dreaded, they were very, very stiff. A servo could turn one, but only just. Raphael improved the situation somewhat with some linkages.
Barbot v1 had its public debut on Saturday, March 29th at our first rent party.
Work on Barbot v2, Barbot with a Budget, began in earnest on Saturday, April 19th.
The new valve and valve control unit was completed on Sunday, April 27th.
The new interface and lighting board is expected to be completed by Saturday, May 3rd.
Barbot v1/2 will be presented at Dorkbot on Wednesday, May 7th.
Barbot v2 will be fully operational in time for the next rent party on May 17th, 2008.
Glassware
[edit | edit source]Barbot uses 250ml low-form glass beakers. Beakers are ordinarily about $1.50 in bulk. We expect to lose two or three to breakage per party. Our current inventory stands at 47 party-ready beakers.
Turntable
[edit | edit source]The rotor from the first version of barbot will be used for v2.
The geneva drive mechanism has been laser cut thanks to the efforts of Jon Santiago at the SSBx fab lab.
The final collar has been cut (thanks, Eric!).
The turntable has been cut.
The new mounting/bearing mechanism will be built this weekend.
Stirrer
[edit | edit source]Raph has built an awesome drink stirrer. We'll attempt to find a lucite/acrylic/glass rod for it soon.
Valves and tubing
[edit | edit source]We are using 1/4" tubing to carry liquids. That's a lot thicker than we should, so we'll keep the valves close to the drinks, and maybe add some form of nozzle. We've moved to thicker-walled tubes in v2 to reduce kinking and tangling.
We have abandoned the old hand-operated food processing valves and opted for more expensive but reliable solenoid-driven valves.
Driving valves
[edit | edit source]The new valves are 12V solenoids. We're driving them with logic-level n-channel mosfets.
Safety
[edit | edit source]The valves are FDA-approved food processing valves.
Firmware
[edit | edit source]For historical perspective:
(4:54:15 PM) work: did you get that arduino stuff working?
(4:55:32 PM) Raphael Abrams (work): I'm giving up on software serial
 and going to use some of my own custom arduino boards
(4:55:37 PM) Raphael Abrams (work): it's EASIER
(4:56:13 PM) work: good
(4:56:17 PM) work: fuck that arduino noise
All firmware is checked into Resistor SVN. I'm currently writing it all as raw atmega168 code, rather than messing around with arduinos. Fuck that arduino noise.
Valve firmware is complete.
Display/button board firmware is 2/3 complete.
I/O
[edit | edit source]Outputs:
- 6 servos for the valves
- 1 DC motor for the turntable
- 1 servo and 1 DC motor for the stirrer (optional)
- At least 4 controllable LEDs to indicate operation
- 1 DC motor for new beaker feed mechanism (optional)
Inputs:
- 2 switches for the turntable
- 1 switch to indicate drink chute is full
- 1 switch to indicate empty beaker is ready
- ONE LARGE RED BUTTON TO SHUT ALL VALVES AND STOP EVERYTHING
Software
[edit | edit source]Serial over USB to communicate. Going to set up some simple preprogrammed drinks on a laptop.
Protocol
[edit | edit source]We're using a variant of the Barbot v1 protocol:
Power
[edit | edit source]Using a standard PC power supply.